The Attacking Bisque, part 1
Posted 26 November 2007 to Handicap Play, Tactics by Jeff Sooby Jeff Soo
Players mostly use bisques to correct playing errors. Miss a roquet, or fail to get position at a wicket, then take a bisque so that you can continue. This kind of bisque is easy to understand and requires only minimal planning (see Bisque Basics and A Bisque In Time).
But bisques can also be used tactically. You can, at the start of a turn, plan out a sequence of shots that includes bisques, to create a four-ball break. Bisques used in this way allow you to pick up a break from an otherwise unpromising position. This requires more forethought and, at times, creativity than the first kind of bisque use.
The first way is reactive, the second proactive. The reactive bisque is what you use when you have already established a four-ball break and need to fix it (having read Bisquenomics, you are of course not squandering your bisques on anything less worthy than a four-ball break). The proactive bisque is how you get that break started in the first place. To succeed at handicap play you need both. We’ve looked in some detail at reactive bisque use in the previous articles, so now it’s time to get proactive.
First let’s review the elements of a four-ball break. The basic position is that you are alive on all three of the other balls and can easily roquet one of them, while another is in the middle of the court, and another is at your wicket. You roquet the first ball, then croquet it one wicket ahead while approaching the ball in the middle—the pivot. Roquet the pivot, then take off to the ball at your wicket, roquet it, get position, and run the wicket. Now the cycle begins again.
This is the position you want to achieve with your proactive play. Any point in the cycle will do. The goal is to get there using just one or two bisques. Spending up to two bisques to create a four-ball break is usually a good investment, but using more than that is a less certain value (again, see Bisquenomics).
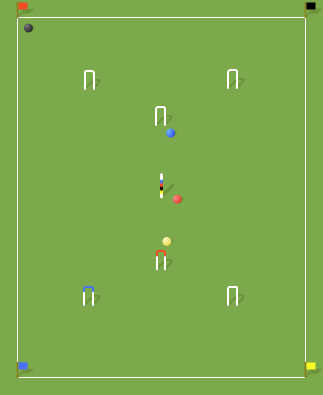
Diagram 1
The best opportunities for this kind of proactive play come when most of the pieces of the four-ball break are already in place. The very simplest sort of case is when everything is there except for the easy roquet. In diagram 1, red has just broken down by missing a hampered roquet after scoring 5. You are playing black, you have bisques, are alive on all balls, and are for 6. The four-ball break is there for the taking; all you need is to roquet yellow. Shoot at yellow, but only just hard enough to get there. If you hit, you have saved a bisque. If you miss, take your bisque and roquet yellow. Send yellow to 1-back while black goes to red, and you’re on your way.
The play in diagram 1 is even easier if black is for 5. Which ball would you shoot to first? An answer appears at the end of the article.
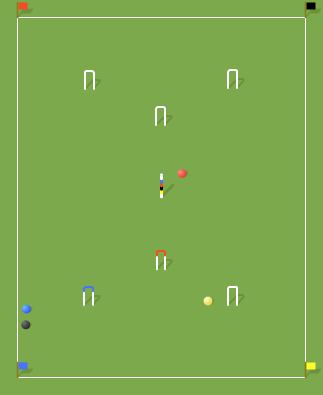
Diagram 2
Or perhaps the missing element is not the initial easy roquet, but the ball at your wicket. In diagram 2 you are again playing black, which is alive on all balls, and the black clip is on 3. Red had just made 4 and then missed an attempt to cut-rush yellow. So you have a ball in the middle and a ball at your next wicket, and all you need to do to obtain a four-ball break is get blue and black up to 3 and score it.
One simple solution is to cut-rush blue up the court, to somewhere around 2. Then roll blue and black over to 3. If you happen to get good position to score the wicket, great, but otherwise take position and then use a bisque to run the wicket. There is another simple solution that doesn’t require a full-roll shot. Can you think of it? Again, an answer is given below.
In the next article we’ll look at some more complicated examples. In the meantime, think of a good way to start a four-ball break in diagram 2, if black is for 4 and is dead on yellow.
ANSWERS
- (Diagram 1, black is for 5.) Whatever you do, don’t go straight to yellow. The most important thing about this play is to get good position on yellow to rush it to the correct side of the wicket. The best way to do that is to approach it with a take-off from red.
- (Diagram 2, black is for 3.) After cut-rushing blue into the lawn, send it to the non-playing side of 3, using a half-roll shot that sends black to red. Roquet red and take off to position at 3. This is probably the easiest sequence for most players, with a fair chance of not even requiring a bisque.
To see all articles in this series, browse the Reference: Handicap Play topic
Last modified on 3 March 2017