The Attacking Bisque, part 3
Posted 10 December 2007 to Handicap Play, Tactics by Jeff Sooby Jeff Soo
As the examples have shown, the attacking bisque greatly increases the opportunities for break play. But to take advantage of these opportunities you have to go beyond ordinary, non-handicap, tactics. Handicap play calls for a different way of looking at the court. You need to develop an eye for the potential four-ball break, and how to use your bisques to create one when not all the pieces are in place.
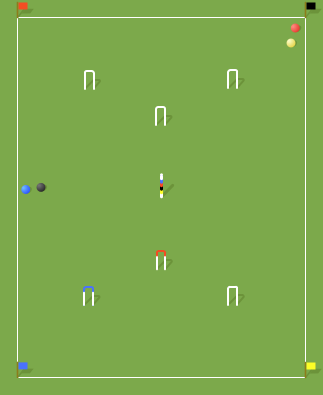
Diagram 5
The question posed at the end of the previous article is a good example. In Diagram 5 (shown here again) you are playing black, are alive on all balls, and are for 3. All the balls are on or very near the boundary, so that without bisques a break would be very difficult for most players to achieve. Indeed, in conventional tactics this looks nothing like a four-ball break. But with a couple of well-planned bisques the break is there for the taking.
Although the set-up may look unpromising, you do have one piece of the break already in place: blue has an easy roquet on another ball. So you won’t need a bisque to get started. Better yet, you can rush black to the middle of the court — pivot position. Or you could cut rush it closer to 3, another key position and one which would make it easier to get to red and yellow. To decide which is better, we’ll need to skip ahead a few shots. The difficult part of this play is working both red and yellow into the break. One of these balls will need to go to 4. The other will need to go either to 3 or to the middle of the court, depending on where you leave black.
It’s easier to roquet yellow first, as it is a little bit in from the corner. But if you roquet yellow and send it somewhere useful, you will be too far from red to roquet it without using an extra bisque. Whereas if you roquet red first, you should be able to send it several yards and still stay close enough to roquet yellow. So plan to go to red first.
How far can you croquet red into the court and still stay close to yellow? Yellow is only a couple of feet in from the corner, so sending red to 4 is out of the question, and even sending it to pivot position is unlikely. But a stop shot that puts red to the non-playing side of 3 will leave the striker’s ball within three or four feet of yellow. So you’ll send red to 3.
That decided, the rest of the sequence falls into place. If red is going to be the ball at 3, black will need to be the pivot. Start by rushing black to pivot position near the stake. Take off to a point a few yards away from red (to avoid the risk of going out of bounds), then use the continuation shot to get within safe roqueting range. Take a bisque and roquet red, then send it to 3 with a stop shot. Roquet yellow and send it to 4 while blue goes to 3. If you don’t get good position at 3 on the croquet shot, use the continuation shot to take position and then take a bisque to begin your four-ball break. Total cost: two bisques. It’s not a play for beginners, because of the distance control required to get to a corner ball, but is well within the capabilities of most players. Try it!
Use the same process to analyze other situations. Start by noting the parts of the break that are already in place. Is there a ball you can easily roquet? If so, can you rush it anywhere useful? That is, can you rush it directly to one of the key positions (wicket, pioneer, or pivot), or to a point from which you can croquet it to one of the key positions while approaching another ball? Is either of the other balls already in one of the key positions? If not, are they easily accessible? Is either of them within ten yards of your wicket? As we’ve seen, even a ball on the boundary near your wicket is usable. The more of these questions you can answer “yes”, the more likely it is you can get a four-ball break using just a bisque or two.
Note that almost of the plays we have looked at require that the striker’s ball is alive on all other balls. It is a basic rule of American-rules tactics that there is no such thing as trivial deadness, and this certainly applies to handicap play.
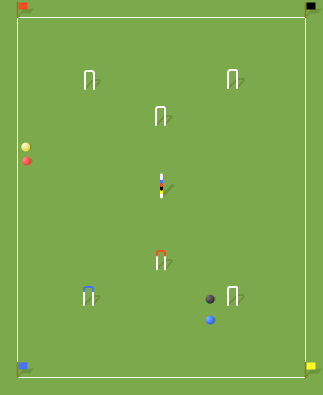
Diagram 6
One more quiz before we move on to the next topic:
In Diagram 6 black has just failed to run 4, bouncing out to the side. It is your turn to play with yellow, which is alive on all balls and is for 2. What is a good sequence to create a four-ball break for yellow, using no more than two bisques? As usual, a good plan uses only straightforward shots, and the set-up should resemble a textbook four-ball break as soon as you have used the bisques. We’ll look at possible answers next time.
To see all articles in this series, browse the Reference: Handicap Play topic